Members
Agents
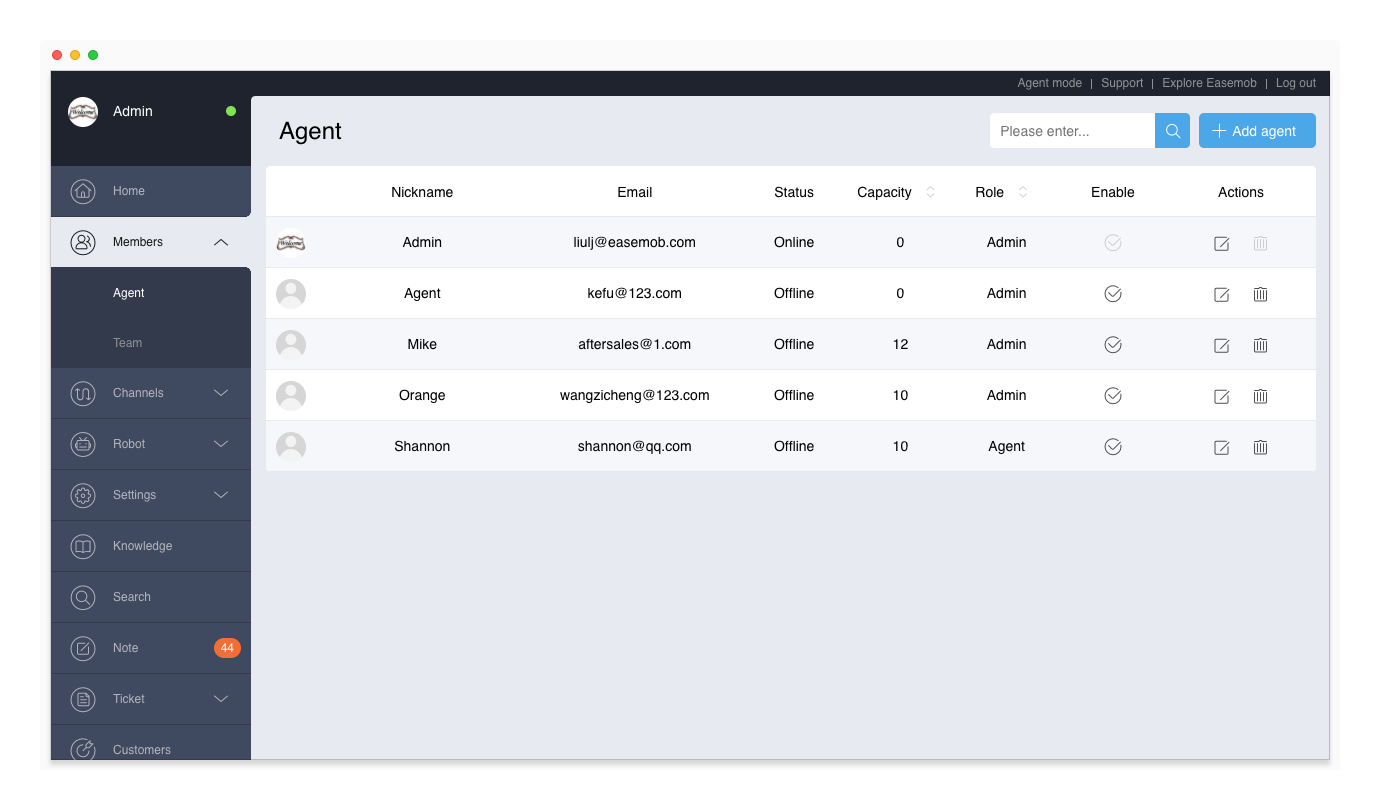
The agent list shows all users (admins and agents). You can search for a user, sort the users by the capacity or role. Users on Hyphenate Customer Engagement Cloud have three roles: admin, agent, and custom role. The permissions of the custom role can be edited.
On the Agent page, you can add an agent, edit an agent's profile, and delete an agent. On Hyphenate Customer Engagement Cloud, go to “Admin Mode > Members > Agent”.

Add an Agent
To add an agent, click Add Agent, fill in the agent information, and click Save.
Search for an Agent
To search for an agent, enter the nickname, email address, real name, phone number, or employee ID and click the Search button. Once the search is complete, click the cross button (x) in the search box to cancel the search.
You can also sort the order of the agents via the capacity or role.
Edit Agent Profile
You can modify the basic information (nickname, email address, password, real name, phone number and employee ID), capacity, and role. To edit an agent's profile, click the Edit button, modify the agent information, and click Save.
- When you change an agent's role to Admin, the system will send a notification to the agent. When the user logs in to the system again, he will become an admin and have the corresponding permissions.
- When you change an admin's role to an agent, the system will send a notification to the user. When the user logs in to the system again, he will become an agent and have the corresponding permissions.
Enable Agent Accounts
Admins can enable or disable the accounts of other admins and agents. The maximum number of enabled accounts under one tenant is licensed. When there is a change to the agents in your company, you can quickly disable an agent's account and enable a new one.
When the account is enabled, the admin/agent can log in to the system and use the functions corresponding to the role. When the account is disabled, the admin/agent cannot log in to the system.
You can enable/disable the account of an admin/agent on the Agent page.
Note: To view your license information, go to “Admin Mode > Settings > Company”.
Set Agents' Maximum Conversations (Capacity)
- If the “Allow agents to set their maximum conversations” feature is turned on, agents can set their maximum conversations on the Conversations page, and the admins cannot change the capacity on the Agent page. To turn on this feature, go to “Admin Mode > Settings > System Settings”.
- If the “Allow agents to set their maximum conversations” feature is turned off, admins can set agent's capacities on the Agent page, and agents cannot change their maximum conversations on the Conversations page. To turn off this feature, go to “Admin Mode > Settings > System Settings”.
Adjust the Limit of Maximum Conversations
At present, an agent's maximum conversations can be any value between 0 to 100. When an agent's ongoing conversations is less than the maximum conversations, the system will automatically assign new conversations to the agent.
If the current limit of maximum conversations does not meet your business needs, you can contact Hyphenate to adjust the limit to 200.
Adjusting the limit of maximum conversations is a value-added service. To activate it, please contact Hyphenate.
Teams
A team consists of agents with similar skill sets. These agents can handle the same type of problems. You can use teams to improve the agents' efficiency and professionalism.
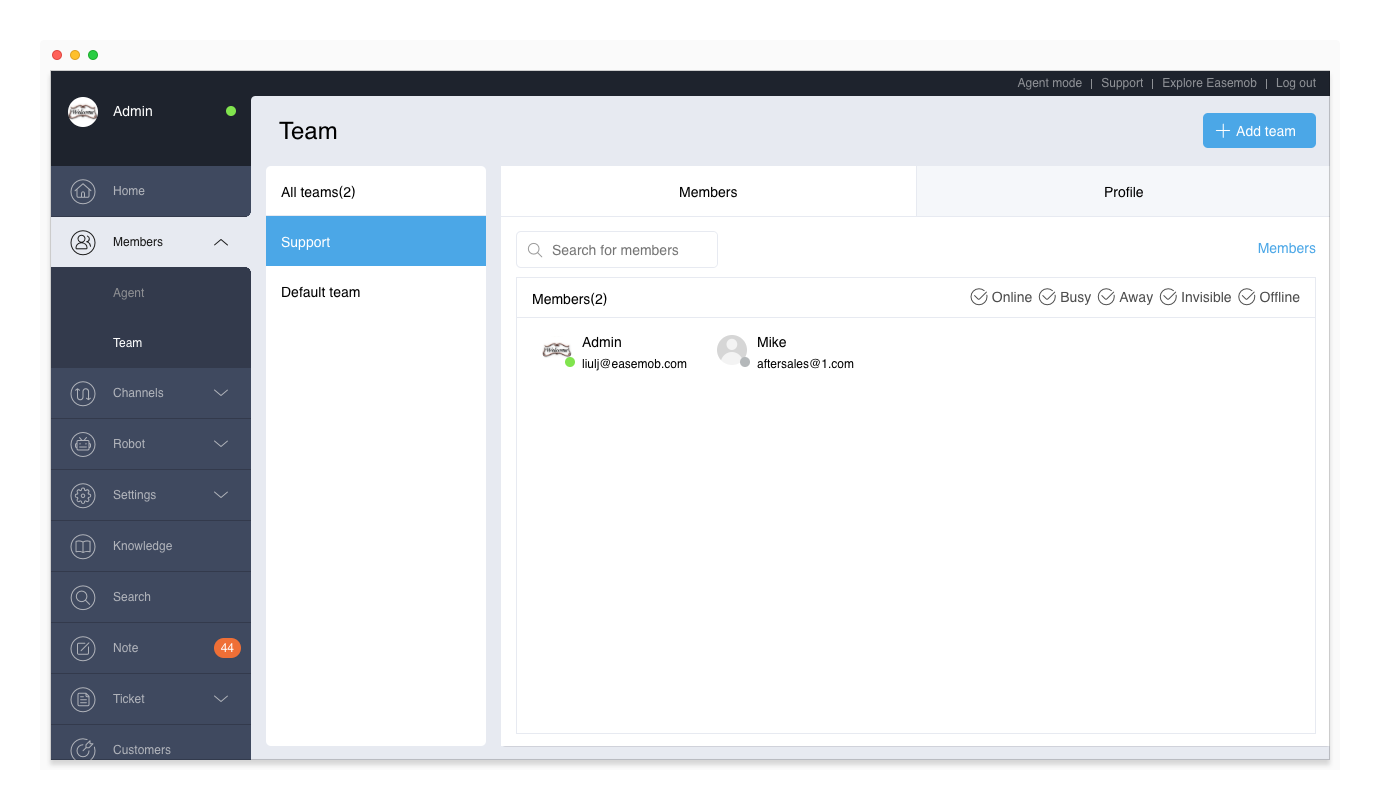
On the Team page, you can create multiple teams and add multiple agents to each team. You can search for members in a team based on the agent nickname, filter team members based on their online status, and update team members in batches.
- Search: In the search box, enter the agent nickname or login email address. The system automatically displays the matching team members.
- Filter: In the top right of the member list, select the online status (select all by default). The system automatically displays the team members in that status.
On Hyphenate Customer Engagement Cloud, go to “Admin Mode > Members > Team”.

Add a Team
To add a team, click Add Team, enter the team name, set the team greeting, and click Save.
- Name: The name uniquely identifies a team. The value can be Chinese characters, English letters or numbers. The name should be consistent with the service the team provides. For example, an “After-sales” team handles after-sales consultations.
- Greeting: The team's greeting. Up to 1000 characters is supported. When a conversation is routed or transferred to a team, the system automatically sends the team's greeting to the customer. Only admins can edit team greetings.
After adding a team, click Members to add members to the team. If there is no member in the team, conversations cannot be transferred to the team.
Set a Team Greeting
You can add ##Hi there## to your greeting. If the customer's nickname is valid, the customer's nickname is displayed; if the customer's nickname is invalid, “Hi there” is displayed. The content between the special characters (####) can be customized.
For example, the greeting is “##Hi there##, what can I do for you?”
- If the customer's nickname is valid (nickname is different from ID), assuming it is Jon, the greeting sent to Jon is “Jon, what can I do for you?”
- If the customer's nickname is invalid (nickname is the same as ID), the greeting sent to the customer is “Hi there, what can I do for you?”
Note: The greeting is automatically sent to customers only at business hours.
Add Members to a Team
On the Team page, click Members to add members to the team. You can add any agent to any team. A knowledgeable and capable agent can belong to different teams and serve different types of conversations.
Those agents who are not in any team belong to the default team.
If there is no member in the team, conversations cannot be transferred to the team. If a team has been bound with a channel or channel account, the team must have at least one member.
Update Team Members in Bulk
Click Member Management, and switch to Code Mode. In this window, add or remove agents' login email addresses (separated by line breaks) to update the team members in bulk.
Delete a Team
To delete a team, click the Delete button on the Team page.
Note: After a team is deleted, its members belong to the default team and channels or channel accounts that are bound with the team will not have a specified team.
Bind Channel/Channel Account
You can bind teams with channels and channel accounts. To bind a team with a channel or channel account, go to “Admin Mode > Settings > System Settings”. When a team is bound with a channel/channel account, conversations from the channel/channel account will be routed to the team and served by members within the team.
For more information, see Settings (Routing).