目录
Settings
Company
Company info consists of account info and profile. The account info includes the license and expiration date. The profile includes the company logo, company name, tenant ID, phone number, address, and description.
To view the company profile and buy more agents, go to “Admin Mode > Settings > Company”.

Profile
- Logo: Set your company logo by uploading an image. The company logo image can be in the PNG/GIF/JPG format with the size less than 2 MB. The company logo is displayed on the web widget.
- Name: Set your company name. The company name is displayed on the web widget. If the “Show agent nickname to customers” feature is turned on, when a conversation is served by an agent, the web widget displays the agent nickname.
- Tenant ID: Uniquely identifies a tenant. It needs to be set in Web integration.
- Phone: Set your company's phone number.
- Address: Set your company's address.
- License: Number of users (agents and admins) in your tenant.
- Expires: Expiration date of your tenant.
- Description: Describe your company.
Note: The company logo and name can be displayed only on apps and web widgets.
Online Payment
On Hyphenate Customer Engagement Cloud, you can buy new seats, renew your account, buy more seats, and view the order information.
- Go to “Admin Mode > Settings > Company”, and click Purchase.
- Select the payment type, effective period, number of agents, and click Submit Order.
At present, only agent seats in the essential edition can be bought online. Payment types include:
- New purchase: If it's your first time to buy seats, select New Purchase.
- Renewal: If you need to extend your tenant's expiration date, select Renewal.
- Buy more: If you need to increase the number of seats, select Buy More.
Note: When you buy more agent seats, the expiration date of the new seats is the same as that of your tenant. The agent fee is charged based on the expiration date.

System Settings
On the System Settings page, you can set the system's automatic messages and custom messages, and turn on/off features in the system.

Scheduler's nickname
The scheduler sends all the system messages and is displayed as “Scheduler” in the chat window.
To set the scheduler's nickname, go to “Admin Mode > Settings > System Settings”, and enter the nickname in the “Scheduler's nickname” box.
The scheduler uses the company logo as its avatar. (To set the company logo, go to “Admin Mode > Settings > Company”.

Welcome message
The web widget displays a welcome message when a customer opens the chat window. To set the welcome message, go to “Admin Mode > Settings > System Settings”. A welcome message can contain up to 500 characters.
Note: To activate this function on your app, please contact Hyphenate.

Welcome message menu with teams
You can set the welcome message menu and bind each menu item to a team. When a customer clicks a menu item, the conversation is assigned to the corresponding team.
Go to “Admin Mode > Settings > System Settings”, turn on the “welcome message menu with teams” feature, add menu items and bind them with teams.
Note: only the web chat window and H5 page can display the welcome message menu. Specifying teams in the welcome message menu belongs to entry binding. Go to “Admin Mode > Settings > Routing” and move “entry binding” up for a higher priority.

Company greeting
When receiving the first message from a customer, the system replies with a greeting. To set the company greeting, go to “Admin Mode > Settings > System Settings”. A company greeting can contain up to 500 characters.
You can also add ##Hi there## to your greeting. If the customer's nickname is valid, the customer's nickname is displayed; if the customer's nickname is invalid, “Hi there” is displayed. The content between the special characters (####) can be customized.
For example, the greeting is “##Hi there##, what can I do for you?”
- If the customer's nickname is valid (nickname is different from ID), assuming it is Jon, the greeting sent to Jon is “Jon, what can I do for you?”
- If the customer's nickname is invalid (nickname is the same as ID), the greeting sent to the customer is “Hi there, what can I do for you?”
Note: The greeting is automatically sent to customers only at business hours.

Closing message
Before a conversation is closed, the system sends a closing message to the customer. To set the closing message, go to “Admin Mode > Settings > System Settings”.

Off work message
When receiving a message from a customer during non-work hours, the system replies with the off work message. To set the off work message, go to “Admin Mode > Settings > System Settings”.
On the web widget, if the note window is displayed, the system will not send the off work message to customers.

Work hours
The work hours are comprised of schedules from Monday to Sunday. To adapt to different work schedules, you can:
- Set different schedules for weekdays (Monday to Friday) and weekends (Saturday and Sunday).
- Set separate schedules for the morning and the afternoon of the weekdays.
- Set a different schedule for each day within the week.
The start time and end time of a schedule can be set to any time in the range of 00:00 to 24:00 with the minimum dimension of 5 minutes. The start time must be earlier than the end time.
To set the work hours, go to “Admin Mode > Settings > System Settings”. In the Work Hours area, click Add Schedule to add a schedule to the work hours.

Custom message
If you need to send rich media messages to your customers, you may build a web page based on the message format provided by Hyphenate and enter the URL on the “Admin Mode > Settings > System Settings” page. During a conversation, the agent can click the “Custom Message” button above the input box to view the custom messages and send a custom message to the customer.
To set the custom message, go to “Admin Mode > Settings > System Settings”. In the Custom Message area, enter a URL that directs to your custom messages. For information about the custom message format, see Custom Message.

Show agent nicknames to customers
When turned on, customers can see agent nicknames during conversations. When turned off, customers see the company name. This feature is supported on web widgets.
To turn on this feature, go to “Admin Mode > Settings > System Settings”. To enable this feature on your app, you need to integrate Hyphenate API on your app.

Reminders if agent does not reply within the timeout period
If the agent does not reply within the specified timeout period, the system automatically reminds the agent, the customer, or both. To turn on this feature, go to “Admin Mode > Settings > System Settings”.
- “Remind agent”: When turned on, if the agent does not reply within the specified timeout period, the system displays the conversation with a background color on the top of the ongoing list.
- “Remind customer”: If the agent does not reply within the specified timeout period, the system automatically sends a message to the customer.

Close conversations if customer does not reply
When turned on, if a customer didn't reply within the preset timeout period, the system sends messages to remind the customer and, if the customer still doesn't reply, closes the conversation. If the message is empty, no message will be sent.
To turn on this feature, go to “Admin Mode > Settings > System Settings”. You can set the timeout time (when the system sends the first reminder message), the number of reminders, the reminder interval, the reminder message, and the time to automatically close the conversation (x minutes after sending the last reminder message), and the conversations tags and remarks to be added to the closed conversations.

Automatically close inactive conversations
If neither the customer or agent replies within the preset timeout period, the system automatically sends a message to the customer and closes the conversation.
To turn on this feature, go to “Admin Mode > Settings > System Settings”.
Note: If both the features “Close conversations if customer does not reply” and “Automatically close inactive conversations” are turned on, the conversation will be closed automatically when it meets either of the timeout conditions.

Remind queuing customers
After a customer queued for the preset remind time, the system automatically sends a message to the customer. To turn on this feature, go to “Admin Mode > Settings > System Settings”. You can set the message, effective time (all day, work hours, non-work hours), remind time, number of reminders, and remind interval.
- If you set the number of reminders to only 1, the system sends the reminder message to the customer when the customer has been queuing for the remind time.
- If you set the number of reminders to a larger value (such as 3), the system sends the reminder message to the customer when the customer has been queuing for the remind time. Then, each time the customer reaches a reminder interval, the system sends the reminder message to the customer, until the conversation is served by an agent or the number of reminders is reached.
If you also turn on the feature “Add a Note button to the message”, the reminder message carries a Note button, which allows the customer to leave a note and close the conversation.

The feature “Add a Note button to the message” is supported by web widgets. When a customer click the Note button on the web widget, the customer can leave a note in the Note Window. Then, the conversation is closed automatically.
Automatically close timeout queued conversations
If a queuing customer is not served within the preset timeout period, the system automatically closes the conversation. To turn on this feature, go to “Admin Mode > Settings > System Settings”. You can set the reminder message, timeout time, and conversation tags and remarks. The feature is turned off by default.

Require confirmation for conversation transfer
When turned on, the agent who receives a conversation transfer must confirm it; otherwise, the conversation cannot be transferred.
To turn on this feature, go to “Admin Mode > Settings > System Settings”. You can set the timeout period after which the transfer fails.

Precise analytics for teams
When turned on, the transfer window will be changed and the analytics for teams more precise. To turn on this feature, go to “Admin Mode > Settings > System Settings”.

Allow agents to set their maximum conversations
The maximum conversations (capacity) of an agent can be set either by the agent or an admin.
- When this feature is turned on, the maximum conversations (capacity) can only be set by agents.
- When this feature is turned off, the maximum conversations (capacity) can only be set by admins.
Note: When an admin changes the maximum conversations (capacity) of an agent, the system will send a notification message to the agent.

Allow agents to manually join conversations
When turned on, agents can manually join queued conversations. When turned off, they cannot. Admin can always manually join queued conversations. The feature is turned on by default.
To turn off this feature, go to “Admin Mode > Settings > System Settings”. If this feature is turned off, agents can still view queued conversations but cannot manually join the conversations.

Familiarity
When turned on, conversations will be assigned to agents who have served the customers. A customer's conversation can be assigned either to the agent who last served the customer or to the agent who served the customer most frequently. This feature is turned off by default. To turn on this feature, go to “Admin Mode > Settings > System Settings”.
Note: When the familiarity rule is turned on but there is no such agent, the system assign conversations based on its default rules.

Allow agents to view details of queued conversations
When turned on, on the Queue page, an agent can click a queued conversation to view its messages. To turn on this feature, go to “Admin Mode > Settings > System Settings”.

Automatically assign conversations only at work hours
When turned on, the system automatically assign conversations to agents only at work hours. If you want the workload to be equally shared by agents, you can turn on this feature and turn off the “Allow agents to manually join conversations” feature.
To turn on this feature, go to “Admin Mode > Settings > System Settings”.

Enable the Customers page in Agent mode
When turned on, agents can view their interactions with their customers on the Customers page. The feature is turned off by default. To turn on this feature, go to “Admin Mode > Settings > System Settings”.

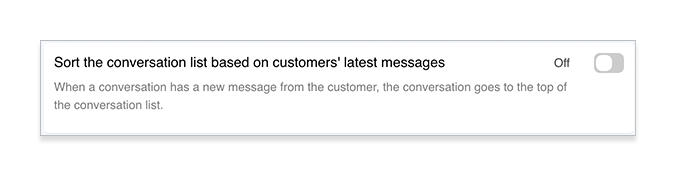
Sort the conversation list based on customers' latest messages
When a conversation has a new message from the customer, the conversation goes to the top of the conversation list. The feature is turned off by default. To turn on this feature, go to “Admin Mode > Settings > System Settings”.
Show the time of the last message exchanged
When turned on, the conversation list shows the time of the last message exchanged between the agent and customer. When turned off, the conversation list shows the time of the last message sent by the customer. The feature is turned off by default. To turn on this feature, go to “Admin Mode > Settings > System Settings”.

Allow agents to proactively invite visitors on your website to start conversations
When visitors are browsing your website, agents can send a customized message to the visitors so that agents can have conversations with the visitors and turn them into customers.
“Proactively invite visitors” is a value-added service. After you activate and turn on this feature, on the Queue page, the agent can invite visitors on your website to start conversations. When an invitation is sent, a window is displayed for the visitor on your website.

Permissions
Admins can create custom roles and set each role's permissions to pages in Agent Mode and Admin Mode.

To create a role for agents:
1. Add a role. Go to “Admin Mode > Settings > Permissions”, click Add Role, enter the role name, and click Add.
2. Set permissions for the role. Click the new role, select the pages in the Agent Mode and Admin Mode, and click Save.
Note: If you want the role to have permission to the Customers page in Agent Mode, you need to go to “Admin Mode > Settings > System Settings” and turn on the “Enable the Customers page in agent mode” feature.
3. Set data permissions for the pages. You can set the data permissions to tenant or team for the Customers, History, and Ongoing pages in the Admin Mode.
- If you grant the role tenant-level data permissions, the user can view and operate all the data on the page, including data of all teams.
- If you grant the role team-level data permissions, the user can view and operate only the data of the team that the user belongs to.
4. Set the role of a user. Go to “Admin Mode > Members > Agent”, click the Edit button to the right of a user, choose a role, and click Save.
Phrases
A phrase is a commonly used message that the agent sends to the customer. Public phrases are set by the admin for use by all agents.
Go to “Admin Mode > Settings > Phrases” to set public phrases. You can add multiple level 1 categories, multiple level 2 categories, and multiple phrases in each category.

Add a Phrase
On the Phrases page:
- To add a level 1 category, click Add Category in the upper right corner on the Phrases page.
- To add a level 2 category, click Add Sub-category within a level 1 category.
- To add a phrase to a level 1 category, click the plus sign (+) to the right of the level 1 category.
- To add a phrase to a level 2 category, click the plus sign (+) to the right of the level 2 category.
Public phrases are displayed on the Conversations page. Agents can use them but cannot edit them.
Import Phrases
If you already have a list of phrases or you need to add a large number of phrases, you can import the phrases to the system.
To import phrases:
- On the Phrases page, click Download Template to download the template.
- Open the template, follow the examples to fill in the phrases and save the workbook. Note: Level-1 and level-2 category names cannot exceed 20 characters, and a phrase cannot exceed 1000 characters.
- Click Import Phrases to upload the workbook to the system. Note: If a level-1 or level-2 category name exceeds 20 characters or a phrase exceeds 1000 characters, the workbook will fail to be imported.
Conversation Tags
A conversation tag summarize and annotates a type of conversations so that the conversations can be analyzed and tracked in the future. Up to 10 levels and 1,000 conversation tags are supported. There can only be 20 level-1 categories.
Conversation tags are set by the admin for use by all agents.
- If you turn on the “Force add conversation tag” feature, the agent must add at least one conversation tag to the conversation before closing it.
- If you turn off the “Force add conversation tag” feature, the agent does not have to add a conversation tag to the conversation before closing it.

Customer Tags
A customer tag identifies a type of customers in order to classify and manage customers. You can organize the customer tags using the import an export function.
Note: When you import customer tags, the system accepts only the new ones. Existing customer tags are filtered out.
Customer tags are set by the admin for use by all agents. After the admin sets the customer tags, agents can add them to customers during conversations. One or more customer tags can be added to one customer.

Customer Fields
Admins can set which custom fields to be shown in customer profiles and the order of the system fields and custom fields. The system and custom fields are displayed on the Profile tab of the Conversations, History, and Customers pages in Agent Mode and the Customers, History, and Ongoing pages in Admin Mode.
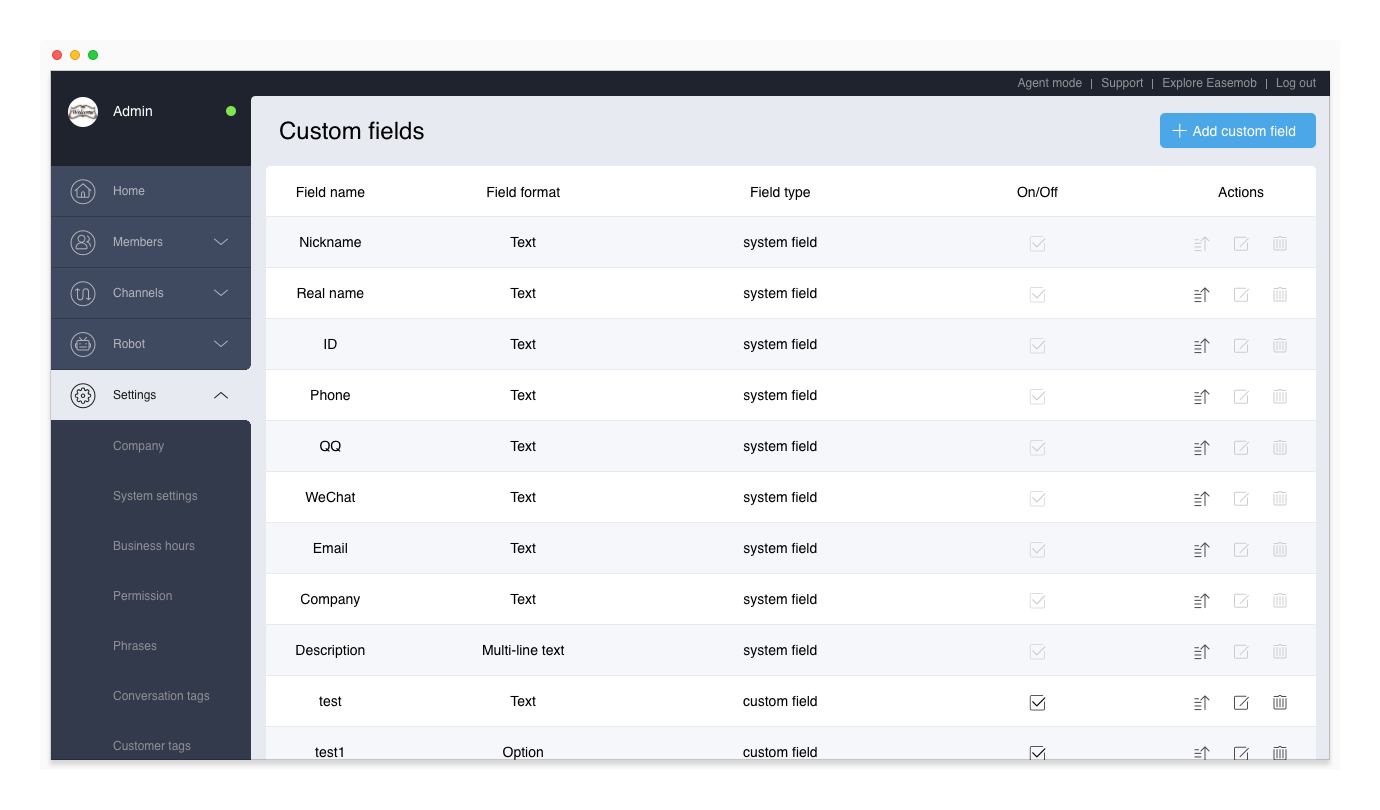
To set a custom field:
1. Go to “Admin Mode > Settings > Custom Fields”.
2. Add a custom field. Click Add Custom Field, enter the field name, select the field format, and set the field content, and then click Save. To add multiple custom fields, repeat this step.
Custom fields are visible to agents by default. To hide a custom field from agents, turn off the “Visible to Agents” feature.
3. Set whether the fields are displayed and the display order. In the “On/Off” column, select  to display a field, and unselect
  to hide a field. Click the sort button to the right of a field
  to move the order of the field up one place.
Satisfaction Survey

Automatically invite customers to rate conversations
If the agent didn't invite the customer to rate the conversation and the customer didn't take the initiative to rate the conversation, when the conversation is closed, the system automatically sends a satisfaction evaluation invitation to the customer.
To turn on this feature for one or more channels, go to “Admin Mode > Settings > System Settings”. When this feature is turned on, you can choose whether to automatically send a satisfaction evaluation invitation when the conversation is served by the robot only.
Set the options in the satisfaction survey to be in descending order
In WeChat and Weibo, the satisfaction survey contains numeric options. When turned off, the options are numbered in ascending order. When turned on, the options are numbered in descending order.
Accept the 1st satisfaction rating in cases of multiple ratings
On app and web widget, a customer can conduct multiple satisfaction ratings for a conversation. When turned on, the 1st satisfaction rating is accepted. When turned off, the last satisfaction rating is accepted.
Do not request for satisfaction rating if the conversation is closed automatically
When turned on, the system does not request for satisfaction rating if the conversation is closed automatically.
Rating options
You can set the text prompts for stars, and add labels for each star level.
For customers:
If you've set the text prompts and labels, the customer has to select a start and a label to finish his satisfaction rating.
Note: Text prompts and labels are supported on the web widget, WeChat, and Weibo.
Review Settings
Review categories can be customized according to your quality control standards. The total score is calculated based on the scores of each category and analyzed to show the overall performance.
The score ranges are divided by the system automatically and used to show the percentage of review ratings that fall in different score ranges.
Note: Modifications to review categories take effect immediately. It is recommended that you set the review categories in the beginning of a month.
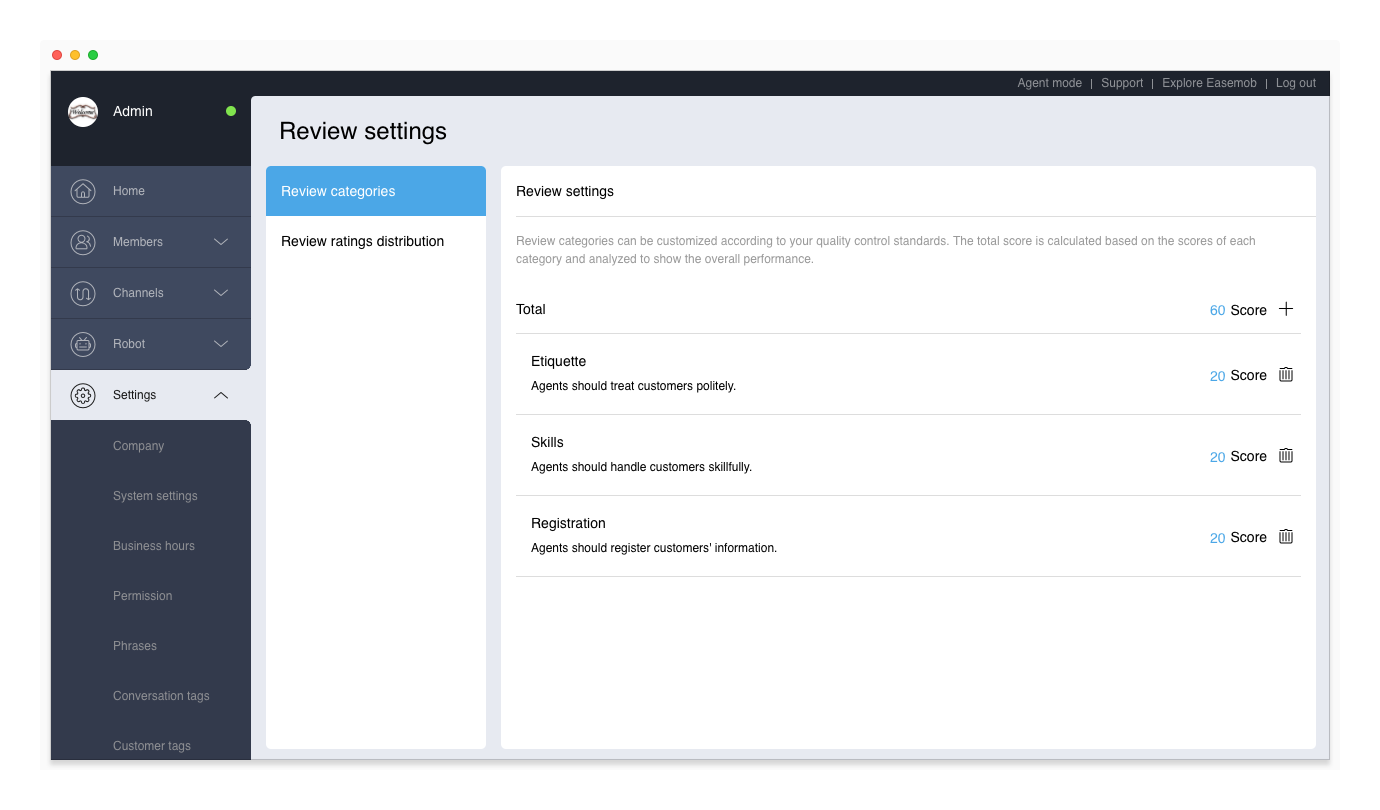
After you set the review categories, the quality inspector can review conversations using these new review categories.
Keyword Match
You can set a regular expression and an auto reply for keywords in customers’ messages. When a customer’s message contains a keyword that matches the regular expression, the system automatically sends the reply to the customer. The keyword match feature can help agents and the robot solve customers' problems flexibly and accurately.
The keyword match function is a value-added service. To activate it, please provide the tenant ID and contact Hyphenate.
To configure a keyword match rule:
Go to “Admin Mode > Settings > Keyword Match”, click Add Matching Rule. In the “Message content detection rule” window, enter the rule name, set the condition (regular expression), and the execution action (Prompt message for the agent, or send message to the customer and agent), and click Save.
- Prompt message for the agent: Display the message in the chat window on the Conversations page. The message is visible only to the agent.
- Send message to the customer and agent: Send the message to the customer as the dispatcher. The message is visible to both the customer and agent.

Iframe
Hyphenate Customer Engagement Cloud provides an open iFrame window (at the right of the Conversations page )to display any information (usually CRM).
You can encrypt the parameters in requests submitted to your CRM system. Hyphenate adopts the DES algorithm-based symmetric encryption method. If you need to encrypt the customized parameters in the GET request, you can set an encryption key of more than 8 bits on the Iframe page. The encrypted GET parameters must be decrypted using the same key. The encryption key is optional and plaintext is used if no key is filled in.
To set the Iframe window:
- Go to “Admin Mode > Settings > Iframe”.
- Fill in the window name and URL address (such as the URL address of your CRM system).
- (Optional) Set the encryption key.
- Click Save.
For information about CRM System Integration, see: CRM System Integration.

Webhook
The Webhook feature pushes events on the Hyphenate Customer Engagement Cloud to third-party servers. For information about the events, see Webhook.
To push an event to a third-party server: - Activate the Webhook feature. - Go to “Admin Mode > Settings > Webhook”. - Click Create Webhook, enter the name and server URL, select an event, and click Save.
Webhook is a value-added service. To activate it, please provide the tenant ID and contact Hyphenate.
